Beginner Goal: Gets JWT Working First
This version is intentionally practical: no database, no bcrypt, no python-jose. We usePyJWT (import jwt) + dummy users so you can clearly understand the JWT flow.
- Create access token and refresh token
- Verify token and read payload claims
- Protect a FastAPI endpoint using Bearer token
- Refresh tokens without logging in again
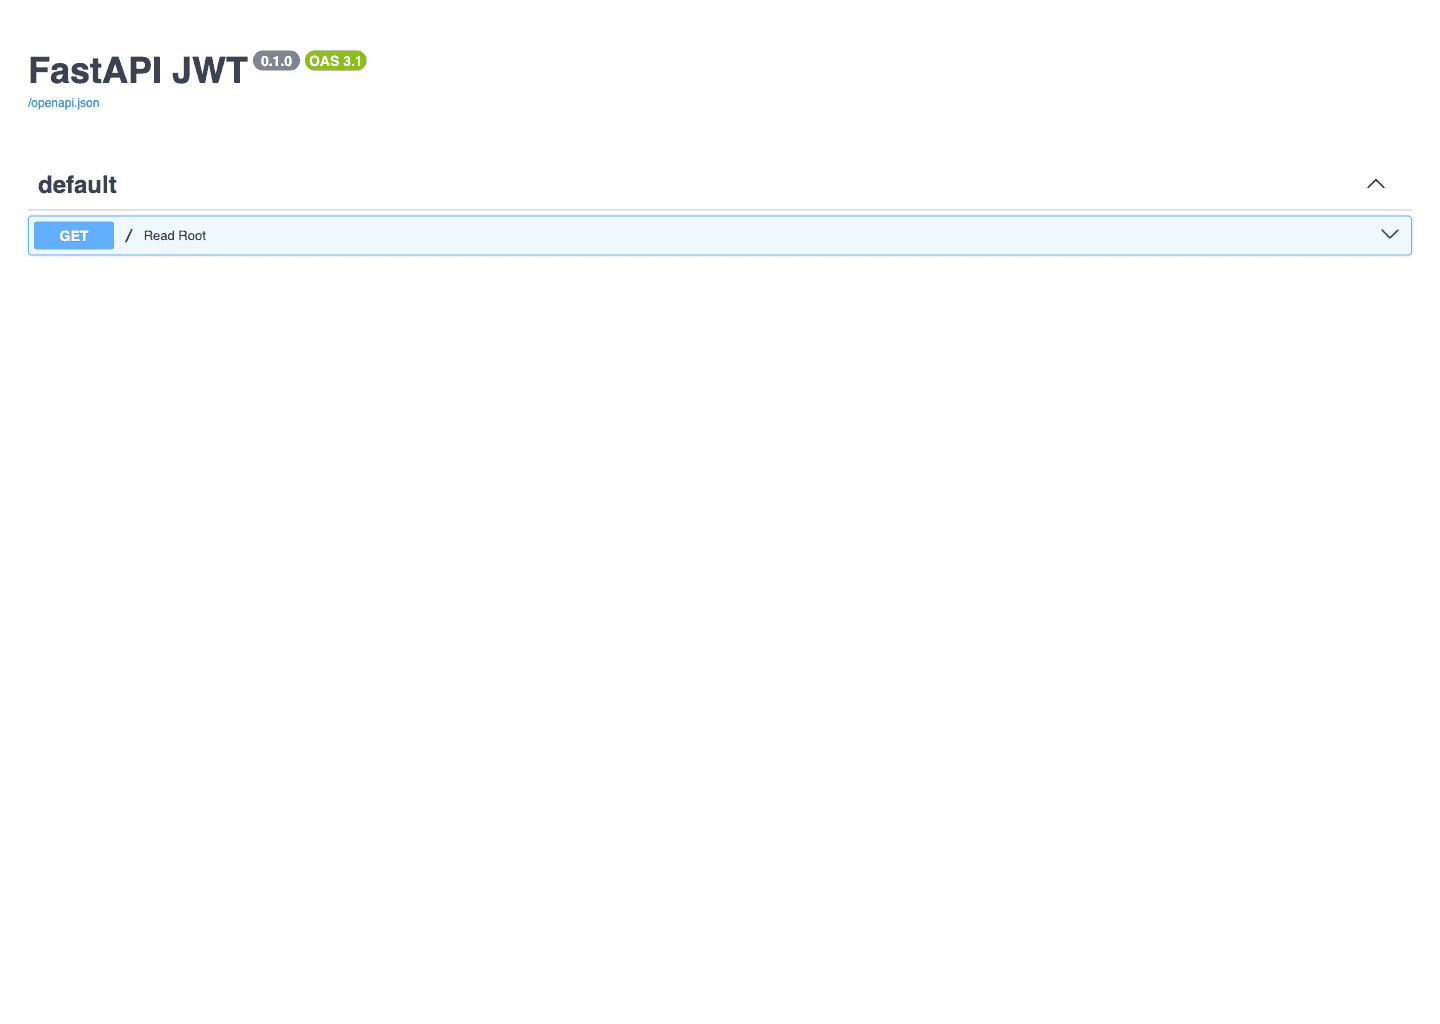
- Practice the flow in Swagger UI (
/docs)
JWT Mental Model (Simple Version)
Think of JWT as a signed note. The server signs it, then the client sends it back on the next request. The server can verify the signature and trust the payload if the token is valid and not expired.
| Token | Purpose | Typical Lifetime |
|---|---|---|
| Access Token | Used to call protected endpoints like /me | Short (e.g. 15 min) |
| Refresh Token | Used to request a new access token | Longer (e.g. 7 days) |
GitHub Demo (Runnable FastAPI Sample)
I added a runnable sample inside this repo so your tutorial has a concrete code reference instead of theory-only notes.
GitHub folder: https://github.com/thirdygayares/thirdyV2/tree/master/examples/fastapi-jwt-beginner
Main files: app/main.py, app/jwt_utils.py, app/settings.py, .env.example
examples/fastapi-jwt-beginner/
├── .env.example
├── .gitignore
├── README.md
├── requirements.txt
└── app/
    ├── __init__.py
    ├── main.py
    ├── jwt_utils.py
└── settings.pySetup + .env (No jose, No bcrypt)
We only install what we need for the JWT flow: FastAPI, Uvicorn, PyJWT, and pydantic-settings for loading values from .env.
fastapi==0.116.1
uvicorn[standard]==0.30.6
PyJWT==2.10.1
pydantic-settings==2.6.1JWT_SECRET_KEY=replace-this-with-a-long-random-secret-key-32chars-min
JWT_ACCESS_TOKEN_EXPIRES=900
JWT_REFRESH_TOKEN_EXPIRES=604800from pydantic_settings import BaseSettings, SettingsConfigDict
class Settings(BaseSettings):
JWT_SECRET_KEY: str = "dev-secret-change-me"
JWT_ACCESS_TOKEN_EXPIRES: int = 900
JWT_REFRESH_TOKEN_EXPIRES: int = 604800
model_config = SettingsConfigDict(
env_file=".env",
env_file_encoding="utf-8",
extra="ignore",
)
settings = Settings()python -m venv .venv
source .venv/bin/activate
pip install -r requirements.txt
cp .env.example .env
uvicorn app.main:app --reloadCore JWT Functions (Access + Refresh)
This is the heart of the tutorial. We create one reusable function (create_jwt_token) and then wrap it withcreate_access_token and create_refresh_token.
from datetime import UTC, datetime, timedelta
from typing import Any

import jwt
from fastapi import HTTPException

from .settings import settings

ALGORITHM = "HS256"


def create_jwt_token(
    user_data: dict[str, Any],
    secret: str = settings.JWT_SECRET_KEY,
    expires_in: int = settings.JWT_ACCESS_TOKEN_EXPIRES,
    token_type: str = "access",
) -> str:
    payload = user_data.copy()
    payload["token_type"] = token_type
    payload["iat"] = datetime.now(UTC)
    payload["exp"] = datetime.now(UTC) + timedelta(seconds=expires_in)
    token = jwt.encode(payload, secret, algorithm=ALGORITHM)
    return token


def create_access_token(user_data: dict[str, Any]) -> str:
    return create_jwt_token(
        user_data=user_data,
        expires_in=settings.JWT_ACCESS_TOKEN_EXPIRES,
        token_type="access",
    )


def create_refresh_token(user_data: dict[str, Any]) -> str:
    return create_jwt_token(
        user_data=user_data,
        expires_in=settings.JWT_REFRESH_TOKEN_EXPIRES,
        token_type="refresh",
    )


def verify_jwt_token(token: str, secret: str = settings.JWT_SECRET_KEY) -> dict[str, Any]:
    try:
        payload = jwt.decode(token, secret, algorithms=[ALGORITHM])
        return payload
    except jwt.ExpiredSignatureError:
        raise HTTPException(status_code=401, detail="Token expired")
    except jwt.InvalidTokenError:
raise HTTPException(status_code=401, detail="Invalid token")| Function | What it does | Why it exists |
|---|---|---|
create_access_token | Builds a short-lived JWT | Used for protected API calls |
create_refresh_token | Builds a longer-lived JWT | Used to issue a new access token |
verify_jwt_token | Decodes and validates signature + expiry | Centralizes error handling |
token_type? It lets you reject a refresh token on endpoints that require an access token (and vice versa).FastAPI Routes with Dummy Data (JWT Only)
No database lookup in this version. We keep a small in-memory dictionary so beginners can focus on token behavior.
from typing import Any

from fastapi import Depends, FastAPI, HTTPException
from fastapi.security import HTTPAuthorizationCredentials, HTTPBearer
from pydantic import BaseModel

from .jwt_utils import create_access_token, create_refresh_token, verify_jwt_token

app = FastAPI(title="FastAPI JWT", version="0.1.0")
security = HTTPBearer(auto_error=False)

DUMMY_USERS: dict[str, dict[str, Any]] = {
    "thirdy": {"id": "user-1", "username": "thirdy", "password": "demo123", "role": "admin"},
    "maria": {"id": "user-2", "username": "maria", "password": "demo123", "role": "user"},
}

class LoginRequest(BaseModel):
    username: str
    password: str

class RefreshRequest(BaseModel):
    refresh_token: str

class TokenResponse(BaseModel):
    access_token: str
    refresh_token: str
    token_type: str = "bearer"

@app.post("/login", response_model=TokenResponse)
def login(payload: LoginRequest):
    user = DUMMY_USERS.get(payload.username)
    if not user or user["password"] != payload.password:
        raise HTTPException(status_code=401, detail="Invalid credentials")

    token_payload = {"sub": user["id"], "username": user["username"], "role": user["role"]}
    return {
        "access_token": create_access_token(token_payload),
        "refresh_token": create_refresh_token(token_payload),
        "token_type": "bearer",
    }


def get_access_payload(credentials: HTTPAuthorizationCredentials | None = Depends(security)):
    if credentials is None:
        raise HTTPException(status_code=401, detail="Missing Bearer token")

    payload = verify_jwt_token(credentials.credentials)
    if payload.get("token_type") != "access":
        raise HTTPException(status_code=401, detail="Access token required")
    return payload

@app.get("/me")
def me(payload = Depends(get_access_payload)):
    return {
        "user_id": payload["sub"],
        "username": payload["username"],
        "role": payload["role"],
        "message": "You used a valid access token",
    }

@app.post("/refresh", response_model=TokenResponse)
def refresh_tokens(payload: RefreshRequest):
    decoded = verify_jwt_token(payload.refresh_token)
    if decoded.get("token_type") != "refresh":
        raise HTTPException(status_code=401, detail="Refresh token required")

    next_payload = {"sub": decoded["sub"], "username": decoded["username"], "role": decoded["role"]}
    return {
        "access_token": create_access_token(next_payload),
        "refresh_token": create_refresh_token(next_payload),
        "token_type": "bearer",
}/login, /me, /refresh) you already understand the full JWT lifecycle.Practice in Swagger UI (/docs)
Swagger UI is perfect for beginners because you can test the flow visually without building a frontend yet.
http://127.0.0.1:8000/docs. Use this to test login, protected routes, and refresh flow.- 1Open
http://127.0.0.1:8000/docs - 2Call
POST /loginusingthirdyanddemo123 - 3Copy the
access_tokenandrefresh_token - 4Click Authorize and paste the raw
access_tokenonly - 5Call
GET /me(should return user info) - 6Call
POST /refreshwith therefresh_token - 7Repeat
GET /meusing the newly issued access token
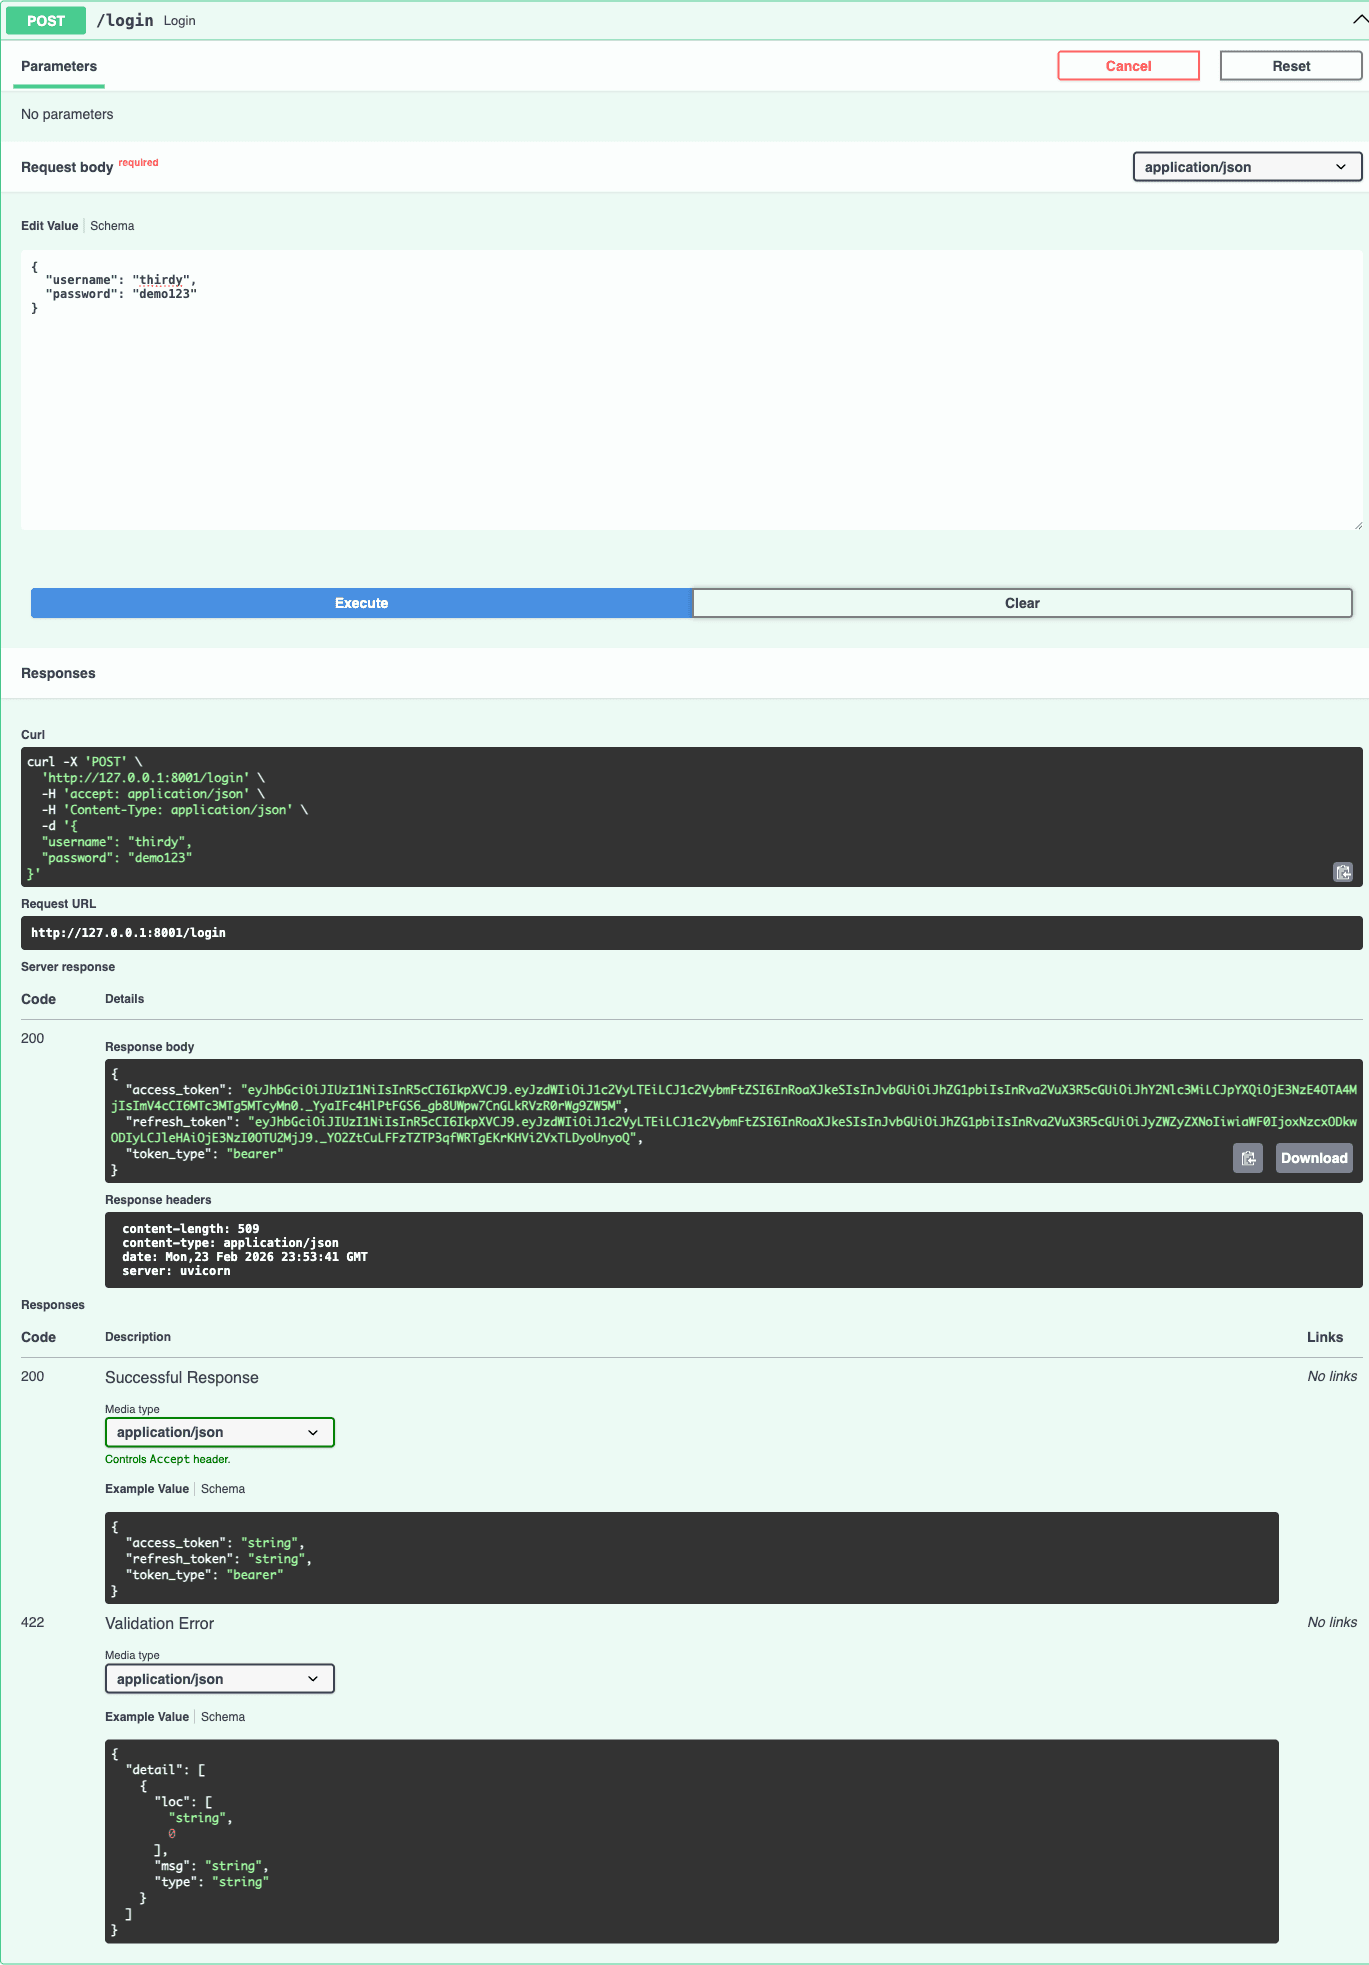
HTTPBearer, paste the token value only. Swagger already adds the Bearer prefix for requests.Swagger Demo: POST /login
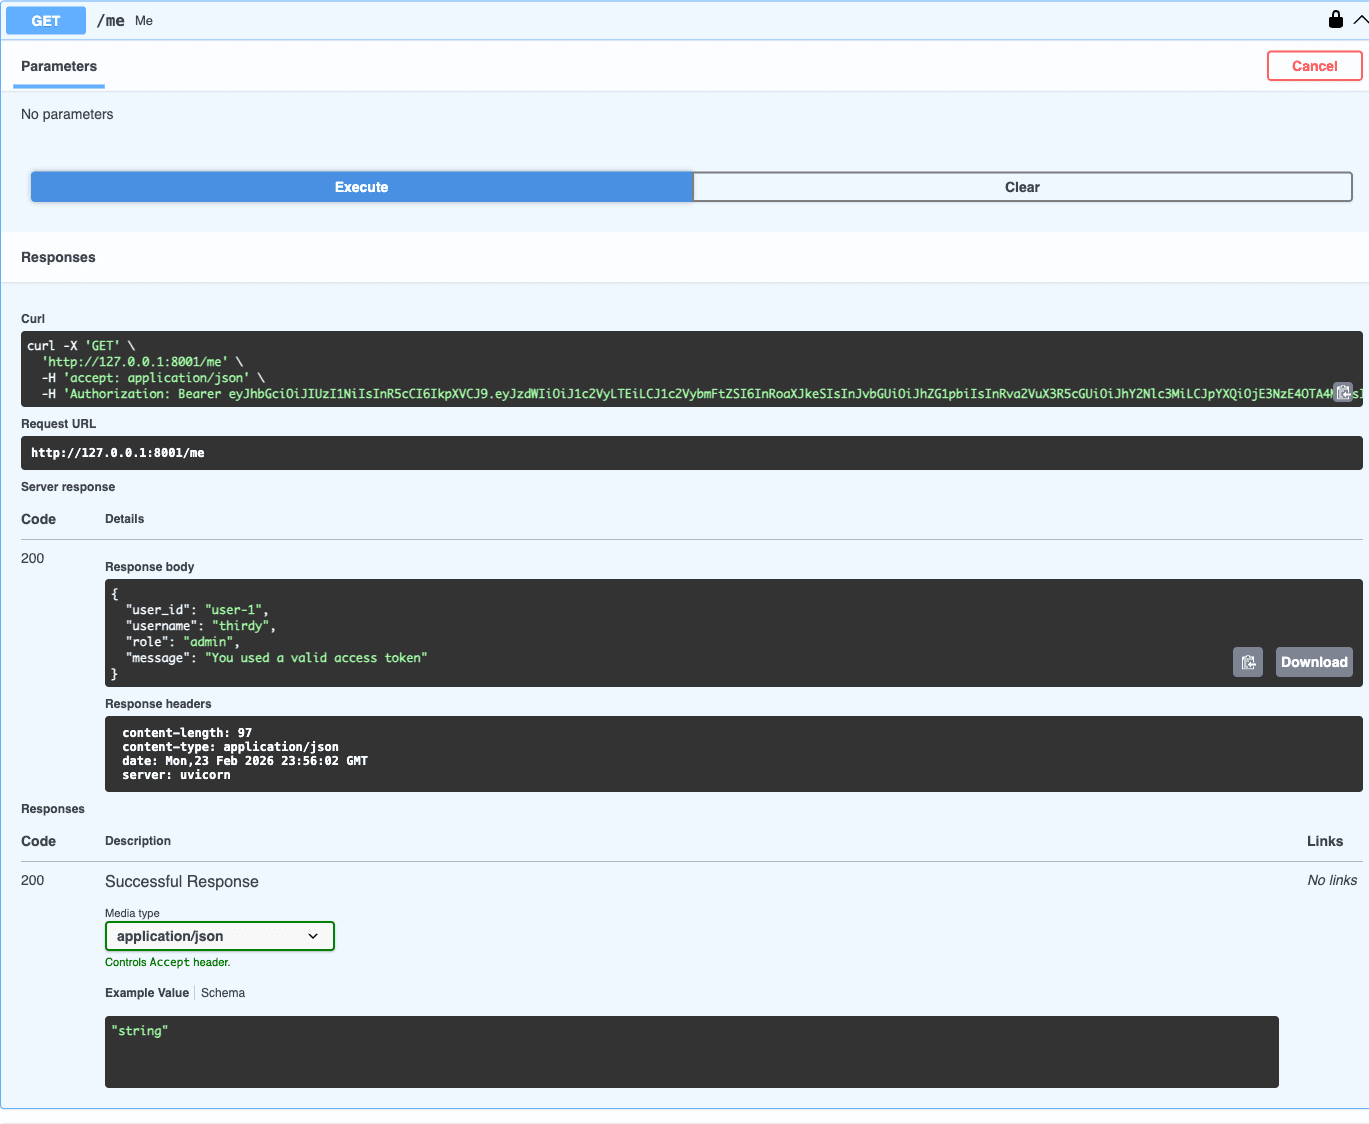
POST /login with thirdy / demo123. The response returns bothaccess_token and refresh_token.Swagger Demo: GET /me (Authorized)
GET /me returns the decoded user data from the token claims.Swagger Demo: POST /refresh
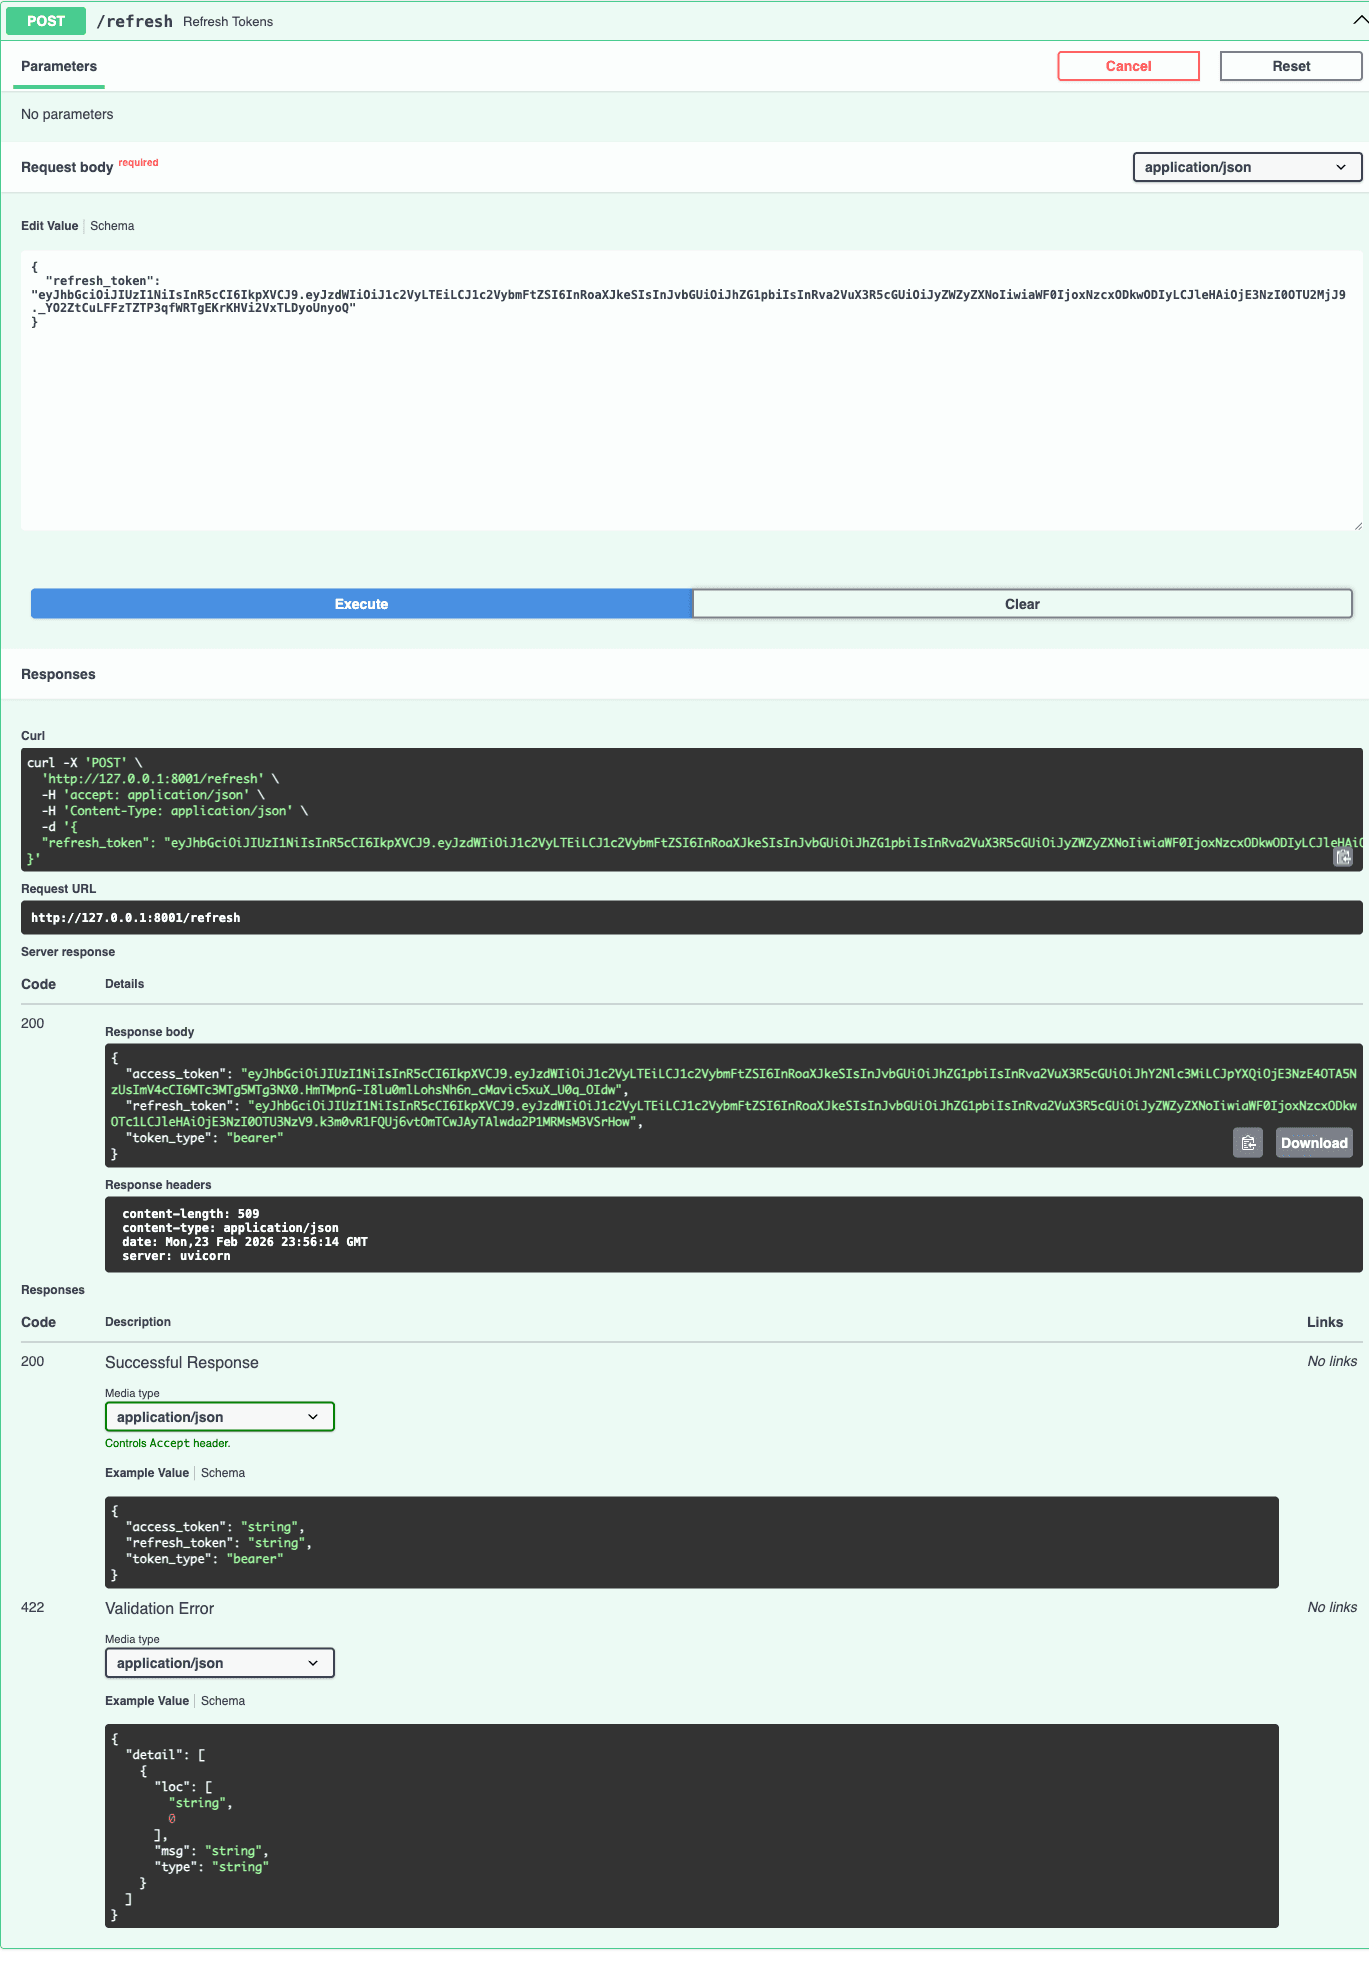
refresh_token to POST /refresh to get a new access token (and a new refresh token in this demo).POST /login
{
"username": "thirdy",
"password": "demo123"
}
Response
{
"access_token": "eyJhbGciOiJIUzI1NiIsInR5cCI6IkpXVCJ9...",
"refresh_token": "eyJhbGciOiJIUzI1NiIsInR5cCI6IkpXVCJ9...",
"token_type": "bearer"
}- Check
token_type(must beaccessfor/me) - Check
expif the token is already expired - Check
sub,username, androlefor expected values
Beginner Scenarios (Try These)
These scenarios help you understand why we separate access and refresh tokens, not just how to generate them.
| Scenario | What to do | Expected result |
|---|---|---|
| 1. Happy path login | Call /login with thirdy/demo123 | You receive access_token + refresh_token |
| 2. Protected endpoint success | Use access token in Authorization: Bearer ... then call /me | 200 response with user info |
| 3. Wrong token type | Send refresh token to /me | 401 + "Access token required" |
| 4. Refresh flow | Send refresh token to /refresh | New access token (and new refresh token) is issued |
| 5. Invalid token | Change 1 character in a token and retry | 401 + "Invalid token" |
| 6. Expired token | Temporarily set JWT_ACCESS_TOKEN_EXPIRES=5 and wait | 401 + "Token expired" then use refresh token |
Common Beginner Mistakes (and Fixes)
| Mistake | Symptom | Fix |
|---|---|---|
| Using refresh token on /me | 401 Access token required | Use access token for protected API calls |
| Swagger modal with `Bearer <token>` | 401 Invalid token (double Bearer) | Paste raw token only in Swagger Authorize modal |
| Missing Bearer prefix in curl/Postman | 401 Missing Bearer token / auth fails | Send `Authorization: Bearer <token>` |
| Wrong secret key | Invalid token after restart | Keep same JWT secret in `.env` while testing |
| Very long access expiry | Looks fine in demo but weak security | Keep access short, refresh longer |
| Treating JWT as encrypted | Sensitive data exposed in payload | JWT payload is readable; never store passwords/secrets |
What to Add Next (After You Understand JWT)
Once the beginner flow is clear, then you can safely add production pieces step by step:
- Bcrypt password hashing for real user passwords
- Database users instead of dummy in-memory data
- Refresh token rotation and token revocation
- HttpOnly cookies for browser-based apps
- Rate limiting on login endpoint
create_access_token vs create_refresh_token, and you can test the cycle in Swagger, you already understand JWT fundamentals in FastAPI.